USING YOUR TELESCOPE AS THE LENS
Prime Focus
Unguided and piggyback photography require modest investments in time and money to achieve good results. Prime focus astrophotography requires a substantial investment in time and money just to get started. The cost in equipment can easily run into the thousands of dollars. Getting the right equipment is the easy part. Prime focus imaging requires skill as a technician. You will encounter numerous challenges and, if you want your photos to look good, you will have to solve them.
The prime focus method is a little bit harder than the others. It involves using your telescope as a very long camera lens. For this method you will need:
- A telescope!
- An SLR camera with removable lens- either film or digital, but digital SLR’s are still rather expensive, so film is probably preferable.*
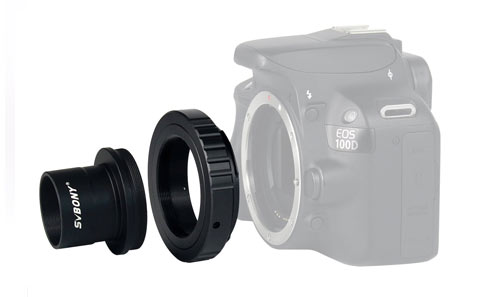
- A camera to telescope adapter. This is any sort of device that gets from the eyepiece holder (or sometimes a special photo-cell at the back of the telescope) to a standard thread which all T-rings fit (I’ll explain T-rings in a moment). A typical such adapter would have a barrel at the bottom like an eyepiece and a wider part at the top with a screw thread.
- A T-ring. This is is a metal ring with a standard screw thread on the inside (a thread that fits all camera-telescope adapters) and a connection that is specific to your camera on the outside. This can either be a screw-thread (Pentax) or bayonet (Minolta, most other manufacturers). T-rings are usually individual to each camera manufacturer, this one’s for a Pentax)
- Helpful but not necessary is a cable release. If you don’t have one you can use the timer on the SLR, so you don’t have to touch the camera as the shutter opens. Alternatively, some DSLR cameras allow remote control over WiFi to avoid shaking the camera.
An SLR is needed because the telescope is now the camera’s lens, hence to see through the telescope the camera viewfinder needs to be actually looking through the lens (an SLR). If you already have a digital SLR that’s great, it’ll be easier for you to pick up the technique as you can see the pictures straight away. But if you don’t have one I wouldn’t rush out and buy one, you’d be better off getting an old mechanical SLR because you won’t run down the batteries and you’ll be able to do the other methods I’ve described as well
So, you’ve got your camera, a T-ring, a camera to telescope adapter and a telescope. Remove the lens of the camera, and put the T-ring in it’s place. Screw the camera-telescope adapter into the T-ring, and then place the barrel in the eyepiece holder. If you look through the camera’s viewfinder, you should be looking through the telescope (you might need to focus it a bit, usually at prime-focus the focus point is at an extreme of the telescope’s focus). You should be ready to go!
* Digital SLR prices are much lower than when this article was written and film has largely gone out of use.
